
I've probably used the 'thrift radiates happiness' phrase before but I am such a fan of the meaning that I'd thought I'd recycle it!
Today I set myself the challenge of spending £20 on clothes- no more, no less. Naturally if I had taken this homily sum to the high street I'd probably have been able to afford one top, unless I went to the not so ethical bargain stores that is, (I'll be honest I have succumbed to a bargain when the finances have been stretched, but I can't justify cheap clothes at the cost of another persons suffering. Its just not right).
Instead I jumped on my bicycle and pedaled to my nearest town to scour the local charity shops (that would be thrift shops to my American readers). I love nothing more than going into a charity shop and having to rummage like I'm looking for buried treasure. I have very eclectic taste in clothing and have been known to wear anything from sequined biker jackets to floor length paisley dresses, so the jumble of clothes in a charity shop is like an Aladdin's cave to me. If I had to label myself I'd say I'm a hippie mixed with vintage sweetheart - the odd surfer girl style piece thrown in here or there!
Today's bounty amounted to:
2 designer paisley shirts
1 African style top
1 pair of never worn silk hippie trousers (still had the tag)!
1 knitted dress


Not bad for £20! A while ago I was supposed to post about an upcycled lamp I made for a friend of mine, so as today's theme is very much about recycling here's a step by step guide to create your own handmade masterpiece.
This Lamp does not contain a Genie.

You will need:
An old lamp with fabric lamp shade (I got mine for £3)
Scrap material
A glue gun
Buttons, felt, ribbon and anything else you want to stick on.
Tracing paper (any old paper will do)
Pins
Scissors
Tape measure
To make:
1. Start by measuring the sectioned panels on the lamp shade so you know how big you need to cut the fabric.
2. Once you know roughly how big your squares of material are going to need to be, draw this onto paper, pin down to material and start cutting!


3. Using a glue gun very carefully apply glue to the lamp shade and quickly add the squares of material (glue guns dry really quickly so its ill advised to put on loads of glue, your going to need to do it piece by piece).
4. Now comes the fun bit, once your lamp is completely covered with material then you can start gluing on felt pieces, or buttons. Use your imagination and go wild!


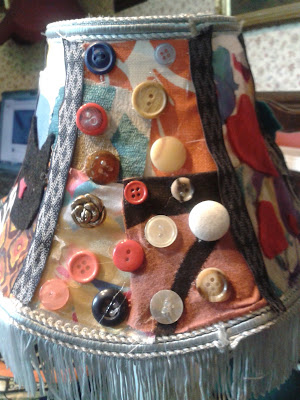


Voila your very own upcycled lamp! Happy crafting (perhaps in a flat spell...)
Stay strong, Surf well
Love
Sophia
x
Today I set myself the challenge of spending £20 on clothes- no more, no less. Naturally if I had taken this homily sum to the high street I'd probably have been able to afford one top, unless I went to the not so ethical bargain stores that is, (I'll be honest I have succumbed to a bargain when the finances have been stretched, but I can't justify cheap clothes at the cost of another persons suffering. Its just not right).
Instead I jumped on my bicycle and pedaled to my nearest town to scour the local charity shops (that would be thrift shops to my American readers). I love nothing more than going into a charity shop and having to rummage like I'm looking for buried treasure. I have very eclectic taste in clothing and have been known to wear anything from sequined biker jackets to floor length paisley dresses, so the jumble of clothes in a charity shop is like an Aladdin's cave to me. If I had to label myself I'd say I'm a hippie mixed with vintage sweetheart - the odd surfer girl style piece thrown in here or there!
Today's bounty amounted to:
2 designer paisley shirts
1 African style top
1 pair of never worn silk hippie trousers (still had the tag)!
1 knitted dress


Not bad for £20! A while ago I was supposed to post about an upcycled lamp I made for a friend of mine, so as today's theme is very much about recycling here's a step by step guide to create your own handmade masterpiece.
This Lamp does not contain a Genie.

You will need:
An old lamp with fabric lamp shade (I got mine for £3)
Scrap material
A glue gun
Buttons, felt, ribbon and anything else you want to stick on.
Tracing paper (any old paper will do)
Pins
Scissors
Tape measure
To make:
1. Start by measuring the sectioned panels on the lamp shade so you know how big you need to cut the fabric.
2. Once you know roughly how big your squares of material are going to need to be, draw this onto paper, pin down to material and start cutting!


3. Using a glue gun very carefully apply glue to the lamp shade and quickly add the squares of material (glue guns dry really quickly so its ill advised to put on loads of glue, your going to need to do it piece by piece).
4. Now comes the fun bit, once your lamp is completely covered with material then you can start gluing on felt pieces, or buttons. Use your imagination and go wild!


Voila your very own upcycled lamp! Happy crafting (perhaps in a flat spell...)
Stay strong, Surf well
Love
Sophia
x
No comments:
Post a Comment